Kubernetes 系列3
Kubernetes 系列3
1. Deployment Strategies
1. Canary Deployment
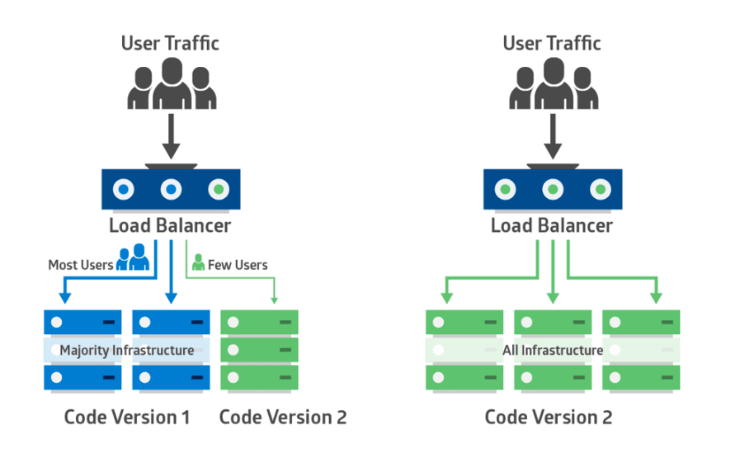
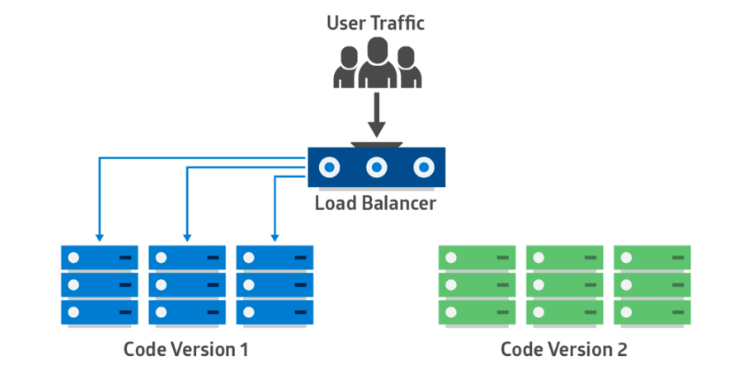
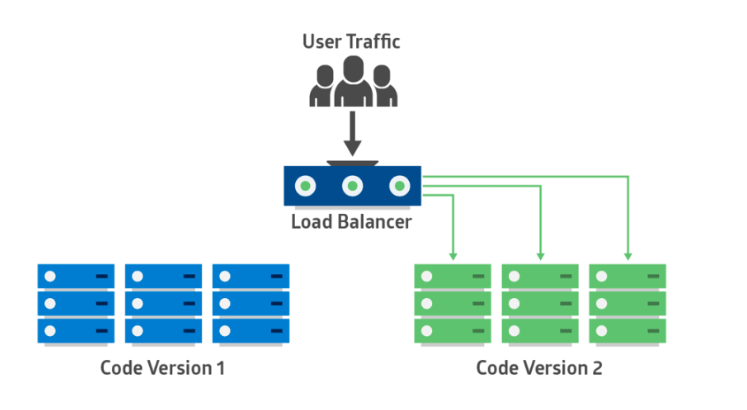
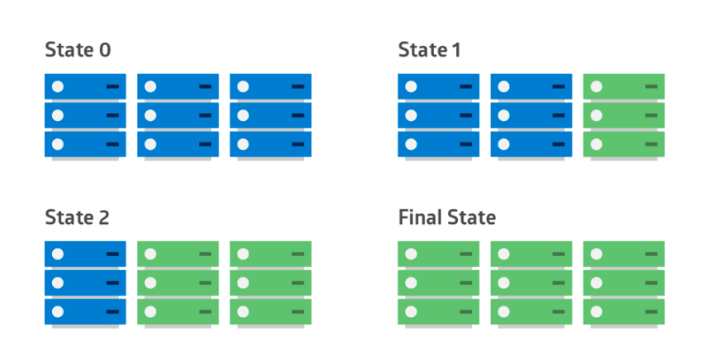
2. Blue-Green Deployment
| phase1 | phase2 |
|---|---|
 |
 |
3. Rolling Deployment
When to use Rolling Deployment?
- When you want to take no downtime during an application update.
- When your application supports having old code and new code running at the same time.
2. Kube Deployment
2.1 Available deployment strategies in kube
Recreate
The Recreate strategy causes all old pods to be deleted before the new ones are created. Use this strategy when your application doesn’t support running multiple versions in parallel and requires the old version to be stopped completely before the new one is started.
RollingUpdate
The RollingUpdate strategy, on the other hand, removes old pods one by one, while adding new ones at the same time, keeping the application available throughout the whole process, and ensuring there’s no drop in its capacity to handle requests.
2.2 Why the concept of Deployment?
kubectl rolling-update updates Pods and ReplicationControllers in a similar fashion. But Deployments are recommended, since they are declarative, server side, and have additional features, such as rolling back to any previous revision even after the rolling update is done.
Why is it obsolete to perform rolling updates by the client? If you lost network connectivity while kubectl was performing the update? The update process would be interrupted mid-way. Pods and ReplicationControllers would end up in an intermediate state
2.3 Deployment Concept
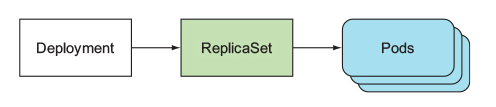
Deployment is a higher-level resource meant for deploying applications and updating them declaratively, instead of doing it through a ReplicationController or a ReplicaSet, which are both considered lower-level concepts. By using deploymeent, you’re just defining the desired state through the single Deployment resource and letting Kubernetes take care of the rest, When you create a Deployment, a ReplicaSet resource is created underneath.
2.4 deployment yaml
apiVersion: extensions/v1beta1 |
2.4.1 readinessProbe
The readiness probe is invoked periodically and determines whether the specific pod should receive client requests or not. When a container’s readiness probe returns success, it’s signaling that the container is ready to accept requests.
- An Exec probe, where a process is executed
- An HTTP GET probe, which sends an HTTP GET request to the container and the HTTP status code of the response determines whether the container is ready or not.
- A TCP Socket probe, which opens a TCP connection to a specified port of the container.
(Unlike liveness probes, if a container fails the readiness check, it won’t be killed or restarted. )
https://kubernetes.io/docs/tasks/configure-pod-container/configure-liveness-readiness-startup-probes/#define-readiness-probes
Configure Probes |
2.4.2 minReadySeconds
If you only define the readiness probe without setting minReadySeconds properly, new pods are considered available immediately when the first invocation of the readiness probe succeeds.
https://stackoverflow.com/questions/53239081/how-does-minreadyseconds-affect-readiness-probe
2.4.3 Controlling the rate of the rollout
| maxSurge | maxUnavailable |
|---|---|
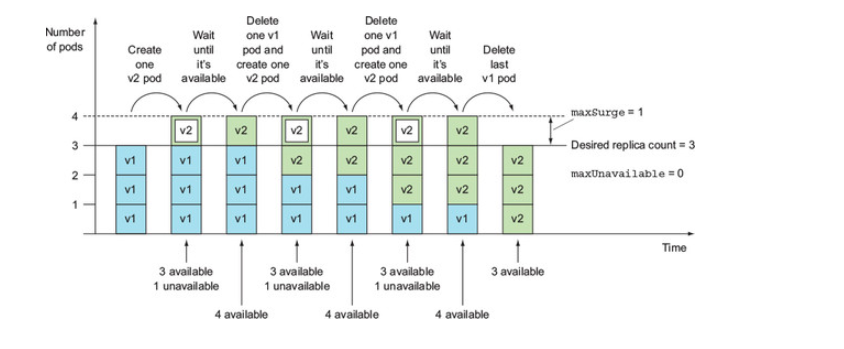
| Determines how many pod instances you allow to exist above the desired replica count configured on the Deployment. It defaults to 25%, so there can be at most 25% more pod instances than the desired count. If the desired replica count is set to four, there will never be more than five pod instances running at the same time during an update. When converting a percentage to an absolute number, the number is rounded up. Instead of a percentage, the value can also be an absolute value (for example, one or two additional pods can be allowed). | Determines how many pod instances can be unavailable relative to the desired replica count during the update. It also defaults to 25%, so the number of available pod instances must never fall below 75% of the desired replica count. Here, when converting a percentage to an absolute number, the number is rounded down. If the desired replica count is set to four and the percentage is 25%, only one pod can be unavailable. There will always be at least three pod instances available to serve requests during the whole rollout. As with maxSurge, you can also specify an absolute value instead of a percentage. |
Eg replica 3 , maxSurge 1, maxUnavailable 0
Eg replca 3, maxSurge 1, maxUnavailable 1
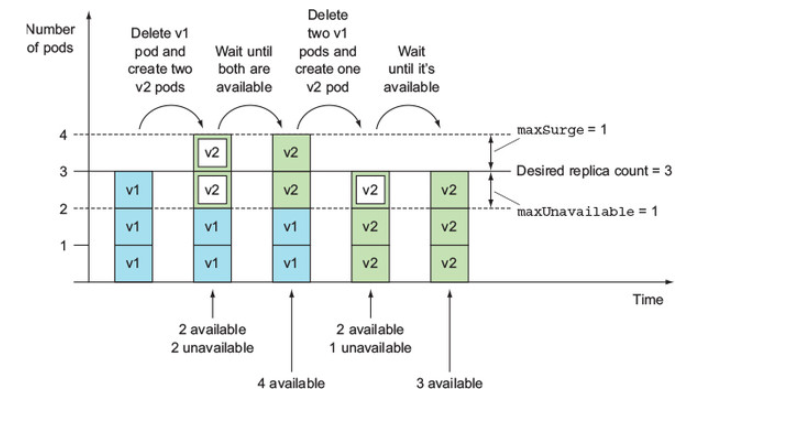
It’s important to keep in mind that maxUnavailable is relative to the desired replica count. If the replica count is set to three and maxUnavailable is set to one, that means that the update process must always keep at least two (3 minus 1) pods available, while the number of pods that aren’t available can exceed one.
2.4.4 progressDeadlineSeconds
The time after which the Deployment is considered failed is configurable through the progressDeadlineSeconds property in the Deployment spec.
2.6 Rollback
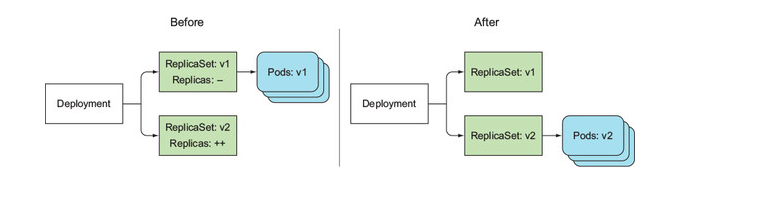
All Replica-Sets created by a Deployment represent the complete revision history, as shown in figure 9.11. Each ReplicaSet stores the complete information of the Deployment at that specific revision, so you shouldn’t delete it manually. If you do, you’ll lose that specific revision from the Deployment’s history, preventing you from rolling back to it.
kubectl get rs |
revisionHistoryLimit (Older ReplicaSets are deleted automatically)
The revision history can be displayed with the kubectl rollout history command:
kubectl rollout history deployment springboot-deployment
rollback to previous revision
kubectl rollout undo deployment springboot-deployment |
rollback to specific deploy revision
kubectl rollout undo deployment springboot-deployment --to-revision=1 |